Tuesday, September 16, 2014


Fall Maintenance Checklist

You’ll be ready for winter’s worst and head off expensive repairs when you complete this checklist of 10 essential fall maintenance tasks.


1. Stow the mower.


If you’re not familiar with fuel stabilizer, you should be. If your mower sits for months with gas in its tank, the gas will slowly deteriorate, which can damage internal engine parts. Fuel stabilizer ($10 for a 10-ounce bottle) prevents gas from degrading.
Add stabilizer to your gasoline can to keep spare gas in good condition over the winter, and top off your mower tank with stabilized gas before you put it away for the winter. Run the mower for five minutes to make sure the stabilizer reaches the carburetor.

Another lawn mower care method is to run your mower dry before stowing it.

1. When the mower is cool, remove the spark plug and pour a capful of engine oil into the spark plug hole.

2. Pull the starter cord a couple of times to distribute the oil, which keeps pistons lubricated and ensures an easy start come spring.

3. Turn the mower on its side and clean out accumulated grass and gunk from the mower deck.

2. Don’t be a drip.

Remove garden hoses from outdoor faucets. Leaving hoses attached can cause water to back up in the faucets and in the plumbing pipes just inside your exterior walls. If freezing temps hit, that water could freeze, expand, and crack the faucet or pipes. Make this an early fall priority so a sudden cold snap doesn’t sneak up and cause damage.

Turn off any shutoff valves on water supply lines that lead to exterior faucets. That way, you’ll guard against minor leaks that may let water enter the faucet.

While you’re at it, drain garden hoses and store them in a shed or garage.

3. Put your sprinkler system to sleep.


Time to drain your irrigation system. Even buried irrigation lines can freeze, leading to busted pipes and broken sprinkler heads.

1. Turn off the water to the system at the main valve.

2. Shut off the automatic controller.

3. Open drain valves to remove water from the system.

4. Remove any above-ground sprinkler heads and shake the water out of them, then replace.

If you don’t have drain valves, then hire an irrigation pro to blow out the systems pipes with compressed air. A pro is worth the $75 to $150 charge to make sure the job is done right, and to ensure you don’t have busted pipes and sprinkler head repairs to make in the spring.

4. Seal the deal.

Grab a couple of tubes of color-matched exterior caulk ($5 for a 12-ounce tube) and make a journey around  your home’s exterior, sealing up cracks between trim and siding, around window and door frames, and where pipes and wires enter your house. Preventing moisture from getting inside your walls is one of the least expensive — and most important — of your fall maintenance jobs. You’ll also seal air leaks that waste energy.

Pick a nice day when temps are above 50 degrees so caulk flows easily.

5. De-gunk your gutters.


Clogged rain gutters can cause ice dams, which can lead to expensive repairs. After the leaves have fallen, clean your gutters to remove leaves, twigs, and gunk. Make sure gutters aren’t sagging and trapping water; tighten gutter hangers and downspout brackets. Replace any worn or damaged gutters and downspouts.

If you find colored grit from asphalt roof shingles in your gutters, beware. That sand-like grit helps protect shingles from the damaging ultraviolet rays of the sun. Look closely for other signs of roof damage (#5, below); it may be time for a roofing replacement.

Your downspouts should extend at least 5 feet away from your house to prevent foundation problems. If they don’t, add downspout extensions; $10 to $20 each.

6. Eyeball your roof.


If you have a steep roof or a multistory house, stay safe and use binoculars to inspect your roof from the ground.

Look for warning signs: Shingles that are buckled, cracked, or missing; rust spots on flashing. Any loose, damaged, or missing shingles should be replaced immediately.

Black algae stains are just cosmetic, but masses of moss and lichen could signal roofing that’s decayed underneath. Call in a pro roofer for a $50 to $100 eval.

A plumbing vent stack usually is flashed with a rubber collar — called a boot — that may crack or loosen over time. They’ll wear out before your roof does, so make sure they’re in good shape. A pro roofer will charge $75 to $150 to replace a boot, depending on how steep your roof is.

7. Direct your drainage.

Take a close look at the soil around your foundation and make sure it slopes away from your house at least 6 vertical inches over 10 feet. That way, you’ll keep water from soaking the soils around your foundation, which could lead to cracks and leaks.

Be sure soil doesn’t touch your siding.

8. Get your furnace in tune.

Schedule an appointment with a heating and cooling pro to get your heating system checked and tuned up for the coming heating season. You’ll pay $50 to $100 for a checkup.

An annual maintenance contract ensures you’re at the top of the list for checks and shaves 20% off the cost of a single visit.

Change your furnace filters, too. This is a job you should do every two months anyway, but if you haven’t, now’s the time. If your HVAC includes a built-in humidifier, make sure the contractor replaces that filter.

9. Prune plants.

Late fall is the best time to prune plants and trees — when the summer growth cycle is over. Your goal is to keep limbs and branches at least 3 feet from your house so moisture won’t drip onto roofing and siding, and to prevent damage to your house exterior during high winds.

For advice on pruning specific plants in your region, check with your state extension service.

10. Give your fireplace a once-over.


To make sure your fireplace is safe, grab a flashlight and look up inside your fireplace flue to make sure the damper opens and closes properly. Open the damper and look up into the flue to make sure it’s free of birds’ nests, branches and leaves, or other obstructions. You should see daylight at the top of the chimney.
Check the firebox for cracked or missing bricks and mortar. If you spot any damage, order a professional fireplace and chimney inspection. An inspection costs $79 to $500.
You fireplace flue should be cleaned of creosote buildup every other year. A professional chimney sweep will charge $150 to $250 for the service.
Tuesday, September 9, 2014

6 Easy, Low-Cost Bathroom Makeovers

Are you looking to add some pizazz to your bathroom before holiday guests use your facilities? If you’re long on determination but short on time and cash, here are some quick, fun makeover ideas that will impress visitors, make your family proud, increase storage space, and help preserve the value of your home.

Prev
5 of 7
Next
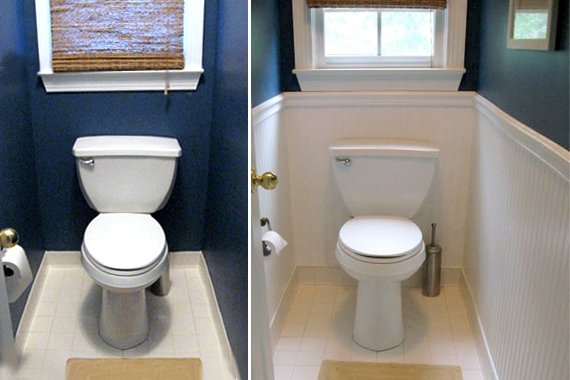
John Gets Formal Attire
Moldings and wall treatments make a serious upgrade — for not-so-serious cash. The wainscoting for this toilet stall is actually wallpaper that looks like beadboard. Topping the wallpaper with chair rail molding completes the transformation, all for about $50 and a few hours’ work.


Credit: Rhoda at Southern Hospitality blog

Wednesday, September 3, 2014

12 Kitchen Backsplash Ideas to Fit Any Budget

These 12 backsplash ideas showcase a variety of materials while covering a range of budgets.

1 of 13
Next
Fabulous Faux
If you’re looking for a money-saving DIY project, install laminated thermoplastic panels. Cut these molded-plastic materials with scissors and mount them with caulk or double-sided tape. There are lots of styles and colors; this one mimics oiled bronze.

Pro: Moisture- and stain-proof; easy to install; good DIY project; lots of textures and colors; easy to clean
Con: Susceptible to heat; improperly applied adhesive may cause panels to loosen
Cost: Kit with 18 sq. ft. of backsplash, trim, outlet covers, & tape is $150


Credit: ©2012 ACP

Tuesday, August 19, 2014

Better Than a Dog Run — Yard Ideas for Your Four-Legged Family Member

  • By:
  • Has homeownership gone to the dogs? Yes! Features fit for furbabies are a must-have for canine-loving homebuyers — like these pet-friendly upgrades that add value.
Prev
7 of 11
Next
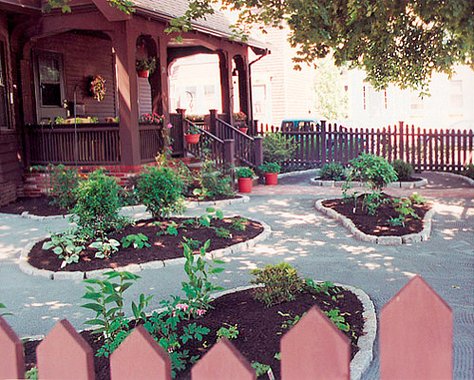
Dog- and People-Friendly Yard
This small space accommodates three dogs and their people. Stone dust, a material known for reducing doggy odors, was used to create pet-friendly paths while plants beds were added for human enjoyment.
Tip: Although stone dust is an inexpensive and low-maintenance option, ¾-inch pea gravel is better for windy areas.
FYI: Indoor dog space is a growing trend; 13% of dogs have their own room.

Image: Geographia Landscape Design

Tuesday, July 29, 2014

Fantastic Concrete Floor Finishes

Think of a concrete floor as a cold gray slab? We’ve got some other ideas for you               


Prev
5 of 11
Next
DIY Effect
Thorough prep — especially removing any trace of oils or grease on the existing slab — were keys to success for this DIY stained concrete floor. The homeowners used tape to mask off faux grout lines, then applied an acid-free, ultra-low-VOC stain ($40/gal. covers 400-500 sq. ft.) Once dry, the tape was removed and the grout lines were colored by hand. The topcoat sealer didn’t hold up to dog traffic, so the owners resealed using a stronger water-based, acrylic-urethane product ($85/gal. covers 200 sq. ft.)

Read more at houselogic.com


Credit: LauraMakes.com

Wednesday, July 23, 2014

Coolest Kitchen Sinks on the Planet


Everything but the kitchen sink? No wonder — it gets so much use, that’s the last thing you’d ever toss. Here’s a guide to some of our favorites.


1 of 11
Next
The Transformer of Sinks
This multi-faceted model is a kitchen wizard. Optional strainers, colanders, cutting boards, and drain racks let you reconfigure and adapt this stainless steel sink to whatever task is at hand.
Type: Self-rimming drop-in
Material: 16-gauge stainless steel
Cost: $1,900 to $3,800, depending on accessories

Credit: Elkay
Image:
See All Slideshows


Read more: http://www.houselogic.com/photos/kitchens/kitchen-sink-pictures/slide/the-transformer-of-sinks/#ixzz38J3lMMEf

Tuesday, July 15, 2014

10 Stunning Crown Molding Ideas

Looking to add a little magic to your rooms? Call in the magician — crown molding can make rooms seem taller, shorter, and fancier. It’ll disappear the seam where walls meet ceilings, put an exclamation point on cabinets and built-ins, and camouflage your remodeling secrets.

1 of 11
Next
The Crowning Touch
Crown molding is a visual treat that adds a touch of elegance. Crown moldings made of wood come in hundreds of profiles and can be stained, painted, or left natural. Because wood tends to expand and contract with changes in humidity, use flexible caulk at joints and seams. Cost: $1.50 to $45 per foot.


Credit: Branca
Image: Branca


Read more: http://www.houselogic.com/photos/home-improvement/crown-moulding-ideas/slide/the-crowning-touch/#ixzz37XtfiEZ5

Tuesday, July 8, 2014

Don’t Let Bad Curb Appeal Happen to YOU!

Your curb appeal — the appearance of your house and surrounding yard — has a lot to say about you. Good curb appeal says you care about your home and your neighborhood. Flub your curb appeal factor, though, and you’ll trash your property value and detract from nearby houses, too. Here are some classic curb appeal no-nos.

1 of 10
Next
Stay in Sync with Your Neighborhood
Sure, you’ve got flair and panache. But take it too far, and your house becomes the proverbial sore thumb of the neighborhood. Better to put your money toward regular maintenance and energy-efficient upgrades that provide a return on your investment.

Image: Ida Aalen/Flickr


Read more: http://www.houselogic.com/photos/landscaping-gardening/dont-let-bad-curb-appeal-happen-you/slide/stay-in-sync-with-your-neighborhood/#ixzz36ttiloGP

Tuesday, July 1, 2014

Grills Gone Wild


Tired of your little kettle charcoal grill? Want an outdoor cooker that comes with more capacity and — let’s be honest — a few bragging rights? You’ll be the talk of the neighborhood when you add one of these wild, custom-made grills to your outdoor kitchen, deck or patio.


1 of 10
Next
Pretty in Pork
If you go whole hog for backyard BBQ, then this artsy grill is just the thing to set on your deck. With 418 square inches of cooking surface, multi-position digital thermostat, and some nicely shaped chops, this beauty gets smokin’ using efficient wood pellets. Pig out for $1,795.


Credit: Traeger Wood Pellet Grills
Image: Traeger Wood Pellet Grills


Read more: http://www.houselogic.com/photos/appliances/grills-gone-wild/slide/pretty-in-pork/#ixzz36EZbnBYr

Tuesday, June 24, 2014

Fence Designs Reveal Your Personality

Fences contribute to curb appeal and help preserve the value of your property. Each fence, however, can be as unique as its owner. Which fence style are you?


1 of 10
Next
Traditional with a Twist
With curvy tops of latticework, these 6-foot-wide modular fence panels wave “hello” every time you see them. Made of weather-resistant, pressure-treated wood, unfinished panels will last for years and will slowly turn a mellow gray color. Cost: $50 to $150 per panel.


Credit: Copyright, KDM International Ltd. — England
See All Slideshows


Read more: http://www.houselogic.com/photos/fences/pictures-fence-designs/slide/traditional-with-a-twist/#ixzz35ab9SmWx

Tuesday, June 10, 2014

WHEN NOT TO TRY AND DIY

Written by Jaymi Naciri on Sunday, 01 June 2014 1:05 pm

You know the saying about your eyes being bigger than your stomach when you order a giant meal at a restaurant and then only eat a fraction? When it comes to DIY, your eyes can be bigger than your skill. Or your balance. Or your finesse.
Paint your room or pull up your carpet or plant some annuals or put together a bookcase. But when it comes to the tough stuff, it's best to know when to call for help. Here are seven times you should call a guy instead of DIY.
1. Anything That Involves Water
You're good with a wrench? You know where the water shut off valve is? You're sure you can take all that plumbing apart and put it back together without any leaks or leftover pieces? Great. But we're not so sure, and we're calling a guy. We just don't mess around with stuff that could flood the house and/or create a mold situation.
"Unless it's something simple like unclogging a toilet or fixing a drain, messing with plumbing can cause major dilemmas (Just think about an overflowing toilet or unstoppable burst in a pipe...not fun)," said Huffington Post. It's always better to ask a plumber before trying to tackle any plumbing issues on your own."
2. Anything That Involves Electricity
We've heard that minor rewiring can be easy. But we're just not fans of being electrocuted. So we're going to leave that to an expert. "You usually don't get a second chance with electricity," said MSN. We couldn't agree more.
3. Hanging Drywall
Give it a shot in an easily accessible area. Hanging drywall can actually be quite rewarding. But in a complicated installation area or one that is high up…no thanks. Watching a professional teeter around on those stilts makes the money spent well worth it. We look at it this way: we can pay the drywall pro up front, or pay it at the ER after we attempt to do it ourselves.
4. Demolition
As any good HGTV-obsessed design lover will agree, swinging a sledgehammer in a crusty old kitchen or bathroom looks like great fun. But you could also do great damage if your don't know how to go about it. "Beyond the risks of asbestos, lead paint dust and other hazardous materials, do you really know what's behind the walls of your home? Gas pipes, water lines and live electrical wires are just a few of the dangers," said MSN.
5. Roof Repair
It's tricky work, it's dangerous, and it's fraught with challenge. Plus, DIY patches on the roof could also end up damaging it even worse, cause a leak, and maybe even void that part of your home warranty. Most roofing companies will come out to give you a free estimate anyway, so no need to risk your safety. For extra protection, call your insurance company if you suspect there is a problem and have them come and check it out. It will cost you nothing.
6. Baseboards and Molding
Mitering corners can drive any sane person who didn't nail algebra (and retain everything they learned) to madness. Unless you're confident you can properly calculate the angles and master that whole "measure twice, cut once" thing, you might want to leave this to the experts.
7. Paving Your Driveway
"Paving stones can turn a boring driveway into a focal point. And while they look relatively simple to install, the reality is that the measuring and positioning of paving stones can be tremendously time-consuming. (Think of it as a game of Tetris on steroids.) But a team of professionals can cut installation down to a day, depending on your driveway size," said the Huffington Post.
With a complicated and/or time-intensive project like this, you just need to admit that you're going to have a meltdown midway through the project and quite possibly flip out and toss the pavers across the lawn. Since you'll have to go ahead and hire someone to finish the project once you hit your tipping point anyway, you might as well just go ahead and make the call in the beginning.

Read more at Realtytimes.com
.

Tuesday, June 3, 2014

June home-maintenance checklist

Early summer chores should get you outdoors: Look for winter damage, ward off mold and rot, sharpen your tools and patrol your home's perimeter for pests and other problems.

By Marilyn Lewis of MSN Real Estat
© Tetra Image

Switch ceiling fan blades


 With the start of summer  and warmer weather, you can focus most of your maintenance chores outdoors. First, however, attend to a couple of jobs that will help you stay comfortable and safe inside the house.
Switch ceiling fans to push cool air down, where you'll most enjoy it. Observe the fan while it's running: In summer, you want the leading edge of the blades (the part that goes around first) higher than the trailing edge (the part that rotates last). Locate the fan's switch on its outside body. When set correctly for summer, you can stand beneath it and feel the breeze. This should allow you to adjust your thermostat higher (or set the air conditioning lower), saving fuel while enjoying the cooling effect of the moving air.
Clean dryer vents
Although you probably know to remove lint from your clothes dryer's lint filter after each use (to prevent fires), you may not have heard that maintenance also includes cleaning the hose that pipes warm, moist air from the dryer to the outdoors. Use a long-handled brush, found in hardware stores (or search online for "dryer vent brush"). Also, clean the recess beneath the filter with a lint-trap brush. Make sure to purchase a brush that fits your dryer's particular lint-trap type. Read the dryer's manual for directions. Check vent hoses to ensure they fit tightly to each other, to the dryer and to the outside of the house. Pull out the dryer and vacuum accumulated lint under and around it.
Tip: Having trouble finding the manual? Search the manufacturer's website or go toLaundry.ManualsOnline.com, register and search for the manual to download it free
Tune up yard and garden equipment
If your lawn mower has gas left over from last fall, empty the tank before adding fresh fuel. (Gas becomes stale after a month.) If possible, just run the mower until the tank is dry (best done in fall before storing the mower for the winter). If that's not possible, use a siphon pump ($3 to $4 at a hardware or automotive supply store, composed of flexible tubing and a squeeze bulb) to transfer the old gas into a gas can. Take the old gas to your county's hazardous waste disposal facility. Call ahead to learn hours and rules for disposing of fuel.
To keep your lawn mower running for years, you'll also want to keep it clean. Avoid cutting wet grass; it's hard on the mower engine. Frequently wipe, brush or scrape the mower's underside clean (with motor off) so clippings don't jam the blades. Change the oil each spring; change spark plugs and lubricate with every change of season (consult the owner's manual for product specifications and directions); replace air filters every couple of years.
Sharpen mower blades
Proper cutting is key to a healthy lawn, and lawns cut with sharp blades need less watering (read10 secrets to a perfect lawn). Also, hard work is made easier with sharp tools. Manufacturers recommend replacing mower blades yearly if the mower is used frequently. Check your blades’ effectiveness by examining the cut edge of the grass: If grass blades are ragged, the lawnmower blade is dull. You can extend the life of a mower blade by sharpening. Call a hardware store, garden supply store or lawn-mower dealer to learn where to get tools and blades sharpened (about $10 to $20) or purchase a sharpening tool (Dremel, for example, makes a head for rotary tools) or buy a whetstone or hand sharpener at a garden supply or hardware store. Before removing the blade from the mower to sharpen it, disconnect the spark plug wire (otherwise you could jump-start the engine by moving the blade). Also, wear safety goggles.
Clean gutters
Take advantage of dry weather to clear out leaves, needles and debris, leaving gutters free to carry rainwater away and protect your home from mold and rot. Depending on your home's surroundings, you should do this several times a year. Hire someone (around $50 to $100) or get a stable ladder (and someone to hold it) and do it yourself. Use a garden trowel or your (gloved) hands to muck out the debris. Scrub gutters with a non-metallic brush. Slosh water from a hose through the gutters and the drainpipes to finish the job and test that they're clear and that water is flowing away from your basement, foundation or crawl space.
Tip: Newer ladders are rated for safety according to their use and the weight they can bear. An industrial-grade Type 1A folding ladder is safest for jobs under 17 feet, according to tests by Consumer Reports. Remain on or below the highest safe rung labeled on your ladder. Use an extension ladder for taller jobs. (See Rutgers University's page on ladder ratings and safe use.) Keep aluminum ladders away from power lines.
Inspect gutters
While you're at it, inspect the gutters. Look for joints separating, loose connections and attachments, sags, dips and corrosion. Tighten or reattach loose gutter connections.
After you've cleaned and repaired your gutters, test them by having someone run a hose into the gutters while you walk around the house, looking for leaks and observing where the water drains. Or walk around the house to check during the next heavy rainstorm.Clean out downspout ends (also called "leaders"). These should extend out at least 3 feet at the ground, though some experts suggest 5 or 10 feet. The idea is to prevent water from running back to your home's foundation.  At the same time, take care that your downspouts don't drain onto your neighbors' property, causing problems for them. Some cities have ordinances regulating the distance you can discharge your gutters from your property line (ask for details at the city planning department).
Consider gutter guards
If your gutters fill up frequently, you might want to investigate installing gutter guards (or screens, filters or covers) to reduce — perhaps eliminate — cleaning. There's a wide variety, made from various metals or synthetics. Costs vary from around 60 cents a foot to $7 per foot, plus installation (the average house has roughly 200 feet of gutters), which means you could pay up to $1,500 for materials alone. You could hire someone to clean the gutters (at around $75 each time) for many years for that amount. Although gutter protection is marketed aggressively, systems vary in effectiveness. Check claims by searching product names, and get three or more references from customers who've used the product for several years. Then, call and interview each company.
Inspect for roof leaks
Start on the ground, using binoculars to scan for evidence of roof damage, including shingles that are curling, broken, cracked or missing. To check your roof for structural stability, stand across the street and look at the roof line. If it appears to sag, get a professional to inspect it. The cause could be damage to the roof supports from heavy snow or many layers of roofing materials.
Next, look for telltale signs of roof leaks. Inside, inspect the attic — look at the ceiling, rafters and walls, particularly right beneath the roof — for discoloration or stains. (While you're up there, check to ensure that attic fans are working.) Pay attention to skylights and chimneys, which are prone to leaks. Seepage is most likely at joints and openings where one material meets another and where the flashing (seal) is weak. Go outdoors again and check the siding beneath the eaves for evidence of leaks. Call a roofer to repair leaks and reinforce flashing. Don't put off patching a roof leak, since collected moisture can cause expensive rot and decay. (For DIY roof repairs, read "5 roof repair tips: How to fix leaks and broken shingles.")
Check for foundation cracks
Make a yearly tour of your home's foundation to spot any cracks. Hairline cracks and diagonal cracks that start at windows are unlikely to signal serious problems, but keep an eye on them to see if they change. Call a structural engineer if a small crack grows wider or if you find any of the following:
  • a crack wider than the thickness of your fingernail
  • horizontal cracks
  • a stair-step crack that break bricks, blocks or solid concrete
  • a pattern of cracks that rounds a corner
  • a crack with one side higher than the other
  • a crack that starts narrow and grows wider
To keep moisture out of cracks that you've found to be stable, fill them. Purchase a foundation crack repair kit (many include an instructional CD, goggles and gloves) that uses an expanding polyurethane filler for a permanent seal. Caulk and concrete aren't effective for this. Learn more about foundation cracks and repairs at InspectAPedia.
Patrol the grounds
Spend a half-hour walking around your house with an eye to where the foundation meets the ground. Make sure the earth around the house slopes away from the structure — about an inch per foot is good — so water does not collect around the foundation. Dampness invites mold and mildew and, in worst cases, weakens a foundation. Also, keep your eyes open for signs of termites: wings or droppings that look like little pellets. Rake leaves away from the foundation to discourage mice and rats. Keep garbage cans tightly closed. Store recycling securely and clean bottles and cans well before putting them out so food odors don't attract rodents. Turn compost piles regularly and compost only vegetable matter, not animal products.  
Scrub the decks and porches
On a sunny day, wipe down and hose off lawn, garden and deck furniture. Sweep decks and porches. Inspect wood decks and porches for rot by pressing the wood with your hand, foot or a tool to find any soft spots. Gently probe soft spots with a screwdriver to learn the extent of the damage. Paint stores carry epoxy putty used to harden, seal and stabilize rotted wood. (These are potentially toxic products, so follow directions carefully.) If the damage is severe, replace rotted boards.
If you're painting your deck, make sure to scrub it first. To remove mold from wood decks, use a solution of three quarts warm water, one quart household bleach, one-third cup detergent and two-thirds cup tri-sodium phosphate. Rinse thoroughly after scrubbing, then treat the deck with a commercial fungicide (found, along with TSP, at paint and hardware stores). Caution: Wear rubber gloves, work in a ventilated area and do not mix bleach with any products containing ammonia; the combination creates toxic fumes. To clean composite decking, follow the manufacturer's instructions.
Seal decks against weather
Wood decks need to be painted or stained every two or three years — more often if they face extreme weather. Watch the weather forecast for a spell of several dry days before treating decks. (You don't want to seal moisture into the wood and encourage rot.) If you're unsure if the wood is sufficiently dry, borrow a moisture meter from a paint store (sales people will explain how to use it). Take readings in many spots. When the wood is dry, thoroughly strip old stain or paint before applying the new finish. Paint stores carry products for this purpose. When renting a power washer, ask for instructions and use it cautiously. Pressure washers can easily gouge and splinter wood decks and railings.

Read more at http://realestate.msn.com/june-home-maintenance-checklist?page=2